Tag Archives: Network

Logstalgia Shows Server Traffic As Pong


Server traffic is a crucial element of the Internet but it’s pretty dull and hard to make interesting…unless you have Logstalgia (aka ApachePong) by Andrew Caudwell. It’s a “website traffic visualization that replays or streams web-server access logs as a pong-like battle between the web server and an never ending torrent of requests. Requests appear as colored balls (the same color as the host) which travel across the screen to arrive at the requested location. Successful requests are hit by the paddle while unsuccessful ones (eg 404 – File Not Found) are missed and pass through.

Here’s what boring web requests can look like….

Todd, you should get this setup for GNC. It would be awesome!


TP-Link AV600 Powerline Review


TP-LInk LogoTP-Link have been releasing steadily HomePlug Powerline products based on the AV600 standard which offers increased capacity for multiple HD streams. TP-Link have kindly sent through some of their new AV600 Powerline gear for a bit of hands-on testing. Regular readers will recall that I’d previously looked at the WiFi Powerline Extender back in December so it will be interesting to compare the faster gear. Let’s take a look.

TP-Link AV600 Box

First, for those who aren’t familiar with HomePlug Powerline, it’s a technology that uses the mains electricity circuits to transmit network signals and as most homes have power sockets in every room, it’s ideal for spreading the network round the house. This AV600 Gigabit Powerline Adaptor Starter Kit (TL-PA6010KIT) has two adaptors, one of which usually connects up to the broadband router or data switch and the other goes into the otherwise network-free room. The box also has two ethernet cables, software CD and a Getting Started guide.

Powerline AV600 Units

As you’ll see from the plugs, these are UK spec units but variants for other countries will be available. The cases are plastic but the seem well-built enough and should resist the normal bumps and knocks that can be encountered round the home. A couple of LEDs indicate the status of the network and transfer activity.

As the adaptors come pre-paired, no configuration is required and getting started is simply a case of plugging them in and attaching network cables. If the adaptors are to be introduced into an existing HomePlug network, there is a small pairing button on the bottom of each unit. Alternatively, a bundled software application can be used to manage the network and add additional adaptors.

These newer 300 and 600 Mbps adaptors use techniques borrowed from wi-fi standards to increase the throughput and to cope with noise and errors but the real-world data transfer rate will never be anywhere close to the rated speed. The overhead of encryption takes its toll on the transfer rate too, but as with wireless it’s very much a necessity to keep data away from prying eyes.

The adaptors in this starter kit come with a single gigabit ethernet port which can either connect to one device or connect into a switch or hub to share the connection. Alternatively, TP-Link have a newer 3 port AV600 version (TL-PA6030) which will keep the back of the entertainment unit a little bit tidier where there’s a smart TV, a game console and a media streamer.

Performance-wise, I did some testing using Totusoft‘s Lan Speed Test. Bear in mind that no two homes will be configured the same, so while the Mbit/s figures are of interest, it’s the relative performance that matters. With that in mind, I tested the data transfer speeds between a Buffalo NAS and a Toshiba laptop using 10 GB files.

  • Wired connection via TP-Link AV600 Powerline – 91 Mb/s
  • Wired connection via TP-Link AV500 Powerline – 72 Mb/s
  • Wired connection via ethernet – 298 Mb/s

These figures tell us two things. First, there’s a measurable performance boost between the older AV500 and the newer AV600 of around 25%. Second, there’s capacity for multiple HD data streams. A 1080p mp4 video stream needs somewhere around 22 Mb/s so at a true 91 Mb/s transfer rate, there’s plenty of capacity for several HD streams. For comparison, a Blu-ray video can output up to 48 Mb/s.

(Again for those people who get all concerned as to why I didn’t get speed “X” Mb/s, it’s the wiring in the building, combined with the features or restrictions of my laptop, data switch and NAS.)

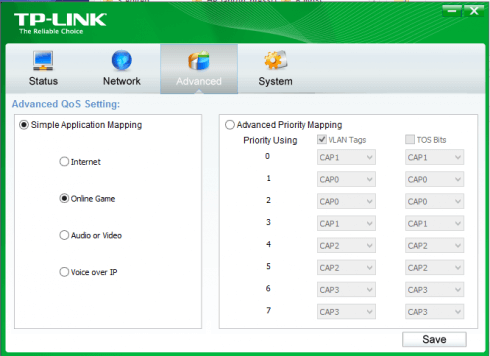
The network management software on the enclosed CD didn’t like my Windows 8.1 and refused to install but an updated version was available from TP-Link’s website. The software lets you monitor the actual speed of the network, add additional adaptors, carry out firmware upgrades and set basic QoS. Some of it was beyond me too!

Local adaptor

TP-Link QoS

The software is nowhere near as good as Devolo’s Cockpit but it does the job most of the time. On a few occasions I found that the app wouldn’t start properly, putting an icon into the System Tray but failing to display a window: usually a reboot resolved the problem. Many people will never need the software as they’ll only plug the Powerline adaptors in and leave them alone. However, for those who want to tinker or setup a larger network, it’s there…if you can get it to work.

Out of interest, I tried moving the receiving end around my house and there were variations in the data transfer rate – broadly, the further apart the adaptors were, the slower the rate. However the drop-off was far less than would be expected on wi-fi with very acceptable data rates throughout the building. If you are tempted to upgrade your HomePlug Powerline network, don’t forget that all the adaptors need to be of the same class (AV600) to boost the network speed.

In summary, the TP-Link AV600 Gigabit Powerline Adaptor Starter Kit improves on the previous product generations and provides fast networking via power outlets. The supporting software needs improvement but with on-line prices a little under £60, the kit is still good value.

Thanks to TP-Link for supplying the review units.


Boosty Your Broadband at The Gadget Show


Boosty BoxWhile many of us are fortunate enough to be served by fibre connections to our homes, many of us are still stuck on copper ADSL circuits with single digit download speeds. This isn’t great, especially with the rise of on-line gaming, movies-on-demand and second screening. Most of us have a another high speed data connection in our smartphone and this is where Boosty comes in, seamlessly adding a 3G / 4G mobile data connection to your home network.

I talk to Paul about how easy it is to add the box to your network and the accompanying service which lets you control who uses the mobile data and how much data is used. The Boosty box can use a WiFi connected smartphone or a 3G/4G USB dongle.

Boosty will be available in the next few weeks for £69.99 which includes the cost of the Boosty box plus a year’s subscription to the service. Pre-order at the Boosty site now.


D-Link NVR and Low-Light Webcam


D-Link LogoAt CES’ Digital Experience, Ken from D-Link tells Todd about their new network video recorder (NVR) and low-light webcam.

The NVR can record up to 9 IP cameras at once, storing the images on the SATA drive. The feeds can be viewed either via an attached HDMI monitor or else viewed remotely via D-Link’s mydlink solution which securely connects from the Internet back to devices in the home, using a web browser or a smartphone app.

The low-light web camera works down to 0.01 lux light levels and can still pick out colours. In complete darkness, a white LED provides illumination for up to 50 feet. As you’d expect, it’s 802.11ac wireless.

Both the NVR and the webcam will have an MSRP of US$379 when they go on sale in April ’14.

Interview by Todd Cochrane of Geek News Central for the TechPodcast Network.

Support my CES 2024 Sponsor:
$11.99 – For a New Domain Name cjcfs3geek
$6.99 a month Economy Hosting (Free domain, professional email, and SSL certificate for the 1st year.) Promo Code: cjcgeek1h
$12.99 a month Managed WordPress Hosting (Free domain, professional email, and SSL certificate for the 1st year.) Promo Code: cjcgeek1w
Support the show by becoming a Geek News Central Insider

Lantronix Prints From Android and Chrome at CES


Lantronix LogoThere are times when only hard copy will do but anyone who has tried to print from a tablet will know that it’s not always easy. The main ecosystems from Apple and Google have their own printer strategies with AirPrint and Cloud Print respectively but support is spotty at best. Several printer manufacturers have gone so far as to create their own printer app which really is a pretty poor state of affairs.

Into this gap steps Lantronix with their xPrintServer Cloud Print Edition, the first Google-certified Cloud Print server which lets Android and ChromeOS devices print wirelessly to network and USB printers. Sweet.

xPrintServer

The unit is about the size of a smartphone and requires no additional software downloads or printer drivers. It’s simply a case of connecting the device to the network and it automatically finds the printers on the network, making them available to users. The xPrintServer Cloud Print Edition supports any device running Google’s Chrome browser, whether it’s a smartphone, tablet, PC or laptop. Apparently there are over 310 million active users of Chrome, so that’s quite a few people who might want to print. Business users of Google Apps are supported too. Details of the printers supported are available from Lantronix’s website.

This new xPrintServer joins the existing Home and Office Editions which provide print services for iOS devices such as the iPhone and iPad.

The Cloud Print Edition sells for an MSRP of US$149.95 and will ship at the end of February 2014. Pre-orders are being taken now and potential customers can sign up at lantronix.com for more information and availability. Of course, if you are at CES, you can pop round to their stand for a quick demo.


Philips Hue and IFTTT


Hue Personal Wireless LightingIn my first post on Philips Hue, I referred to “The Internet of things” where normally dumb devices such as fridges and washing machines are connected to the network. Having a washing machine with an IP address may mean that I can check whether the spin cycle has finished without getting out of my chair, but the real value of the internet of things comes when the devices start communicating among themselves. Not in a nefarious SkyNet way, but in a more practical sense: the washing machine counts the number of washes and when the soap is getting low, automatically orders your preferred brand from your preferred grocery service.

Obviously, it’s going to take a little while until this is a reality, but the web site IFTTT is beginning to show what is possible as more and more services are on-line and cloud-based. IFTTT is an abbreviation of “IThis, Then That” and reflects what IFTTT can do. It automates “If something happens, then I want that to happen”. In IFTTT-speak, a trigger on a channel generates an action on another (or the same) channel. A channel is typically an on-line or cloud-based service such as Twitter, Dropbox, Gmail, Evernote or Weather. An example of what could happen is, “If I get a tweet on Twitter, copy it to Evernote” or “Every morning at 7.00 am, text me the weather forecast”. These are recipes, as IFTTT calls them, and there’s a large range of them already cooked up on the IFTTT web site.

It’s at this point in the story that Philips Hue comes in as a channel on IFTTT, which means that the lights in your home can be controlled by external events via the recipes on IFTTT. Here are some examples of recipes already available; at sunset, turn on the lights; when it’s freezing outside, turn the lights blue; when you receive an email from a particular person, blink the links; when the stockmarket closes down, turn the lights red. Some recipes are perhaps more useful than others, but the range of channels means that there’s tremendous flexibility. There are currently 77 channels on IFTTT and you can browse by channel, so it’s easy to see all the recipes that involve Philips Hue.

Setting up your Hue to work with IFTTT is two step process but it only has to be done once. The first step is to register with the Philips Hue website and allow the site to access the bridge unit within your home. Once you’ve done this and have a username and password, you can control your lights from outside your home using the Hue app on your smartphone too, so it’s probably something that most Hue owners have already done.

Back at IFTTT, the second step is then to activate your Hue channel. You’ll need to supply your Hue username and password, and authorise IFTTT to access your account.

Activate Hue

Now I’m going reuse a recipe that someone else has already created. In this instance, I’m going to flash the lights when I receive an email with the latest GNC podcast. I’ve already activated my Gmail channel.

Gmail to Hue

All I have to do is put in the email address – geeknews at gmail.com – and any time I get an email from Todd, the lights flash. This is the basic recipe; there are others that use keywords or other information likely to be in an email. If I want to, I can choose one particular light or all of them. Once the information is typed in and the recipe has been activated, all I have to do is sit back and wait for the latest podcast email to come in. Blink, blink.

That’s it. All pretty straightforward. If you are more adventurous, you can delve deeper into the recipes to customise them to your needs but there are plenty on IFTTT to get you started and provide inspiration. Philips Hue aside, the insight into the possibilities of the “Internet of things” is incredible.

I hope you have enjoyed this short series of articles on Philips Hue. It’s the first time that I’ve done this kind of short serial, so I’d welcome feedback in the comments on whether to actively search out similar opportunities.

Thanks again to Philips for the loan of the Hue Personal Wireless Lighting System.


Philips Hue Chrome App


Hue Personal Wireless LightingWhile researching the Philips Hue Android apps, I discovered that currently there is a single Hue app for Chrome. It’s called Hueful and while it’s fairly basic, it deserves a mention as (a) it’s the only app on Chrome but (b) it shows that Chrome can support this kind of hardware-oriented app. Previously I would have discounted Chrome from being an option but Hueful works fine on my Chromebook.

Hueful isn’t a very advanced Hue app, being limited to setting colours of selected lamps and colour cycling. Sometimes lamps need to be told twice to take on a setting but they usually get there in the end.

Hueful


Hueful is free from the Chrome store.