Category Archives: review

LinknLink eMotion Max and Pro mmWave Presence Sensors Review


Every smart home owner is likely to be familiar with “passive infra red” (PIR) motion sensors as they’re an easy way to start off making a home a little smarter They’re quite distinctive too, with the slightly opaque domed window on the front. While they’re popular and inexpensive, their downfall is in their name, i.e. motion sensor. If someone’s in a room but sitting still, there’s no motion to pick up and the lights go off which is pretty dumb. I’m sure we’ve all been there, waving arms in the dark to get the lights back on.

To address this annoyance, LinknLink are offering presence sensors which use mmWave frequencies to detect people and animals rather than infrared. It’s all part of the electromagnetic spectrum but by using higher frequencies, the sensors can not only detect presence with the tiniest of movement, they can do clever things like measure distance or track multiple people in the same room. Not to worry, it’s all perfectly safe as this is non-ionising radiation beyond infrared but before microwave.

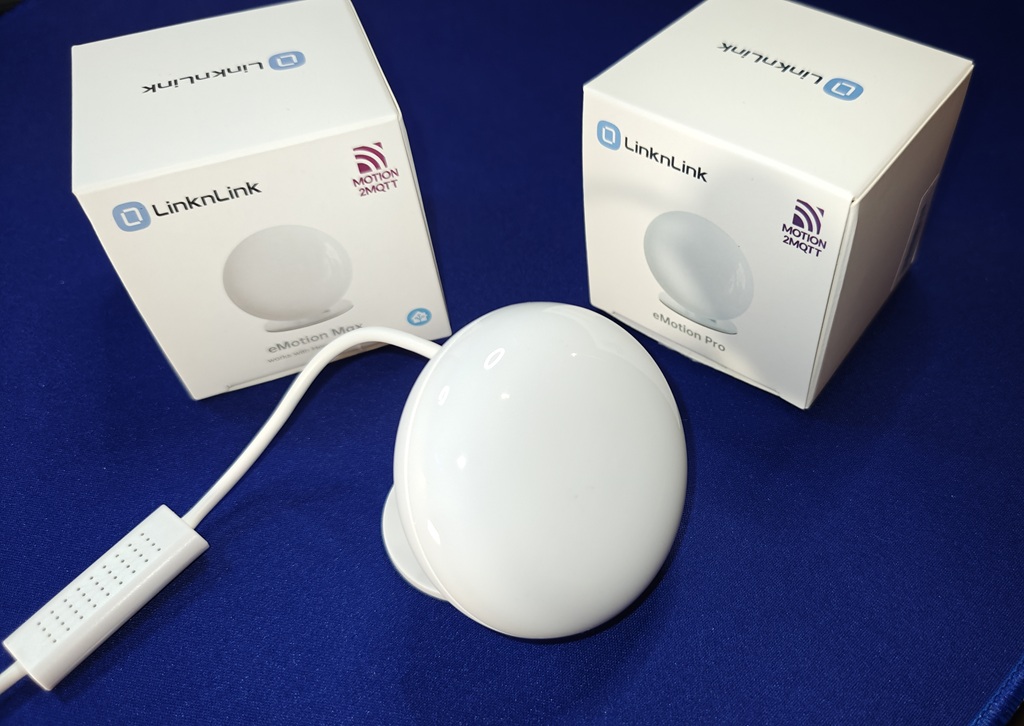
On review here are two LinknLink models, the eMotion Pro and the eMotion Max, plus a THS cable that adds in temperature and humidity measurements to whichever device it’s plugged into. Both the Pro and the Max look identical but the differences are on the inside. The Pro uses 24 GHz and the Max uses 60 GHz for their sensing. Both the Pro and the Max come with an IR blaster too, resulting very useful devices for the monitoring of rooms and the control of devices in the room.

The sensors are large white pebbles about 6 cm across and 2 cm deep. Unlike most PIR sensors which use built-in batteries, these are powered via a (supplied) USB C from a 5V/2A PSU (not supplied). It’s a pro and a con. On the one hand, no need to keep buying batteries, but on the other there’s a cable running from the sensor to a wall socket. To help position the presence sensor in the best spot, there’s a cunning little adjustable mount which sticks to the back. The mount uses sticky pads to adhere to surfaces and it would be even better if there screw holds for a permanent attachment.

Apart from the sensor, cable, mount and instructions, there’s nothing else in the box. Getting the sensors set up is straightforward enough once the relevant app has been downloaded from the App Store or Google Play. After creating an account with LinknLink the app goes through the fairly standard process of the connecting from your phone to the sensors in order to then connect the device to the local WiFi (these aren’t Zigbee devices). In both instances, new firmware needed to uploaded to the sensor before proceeding further.

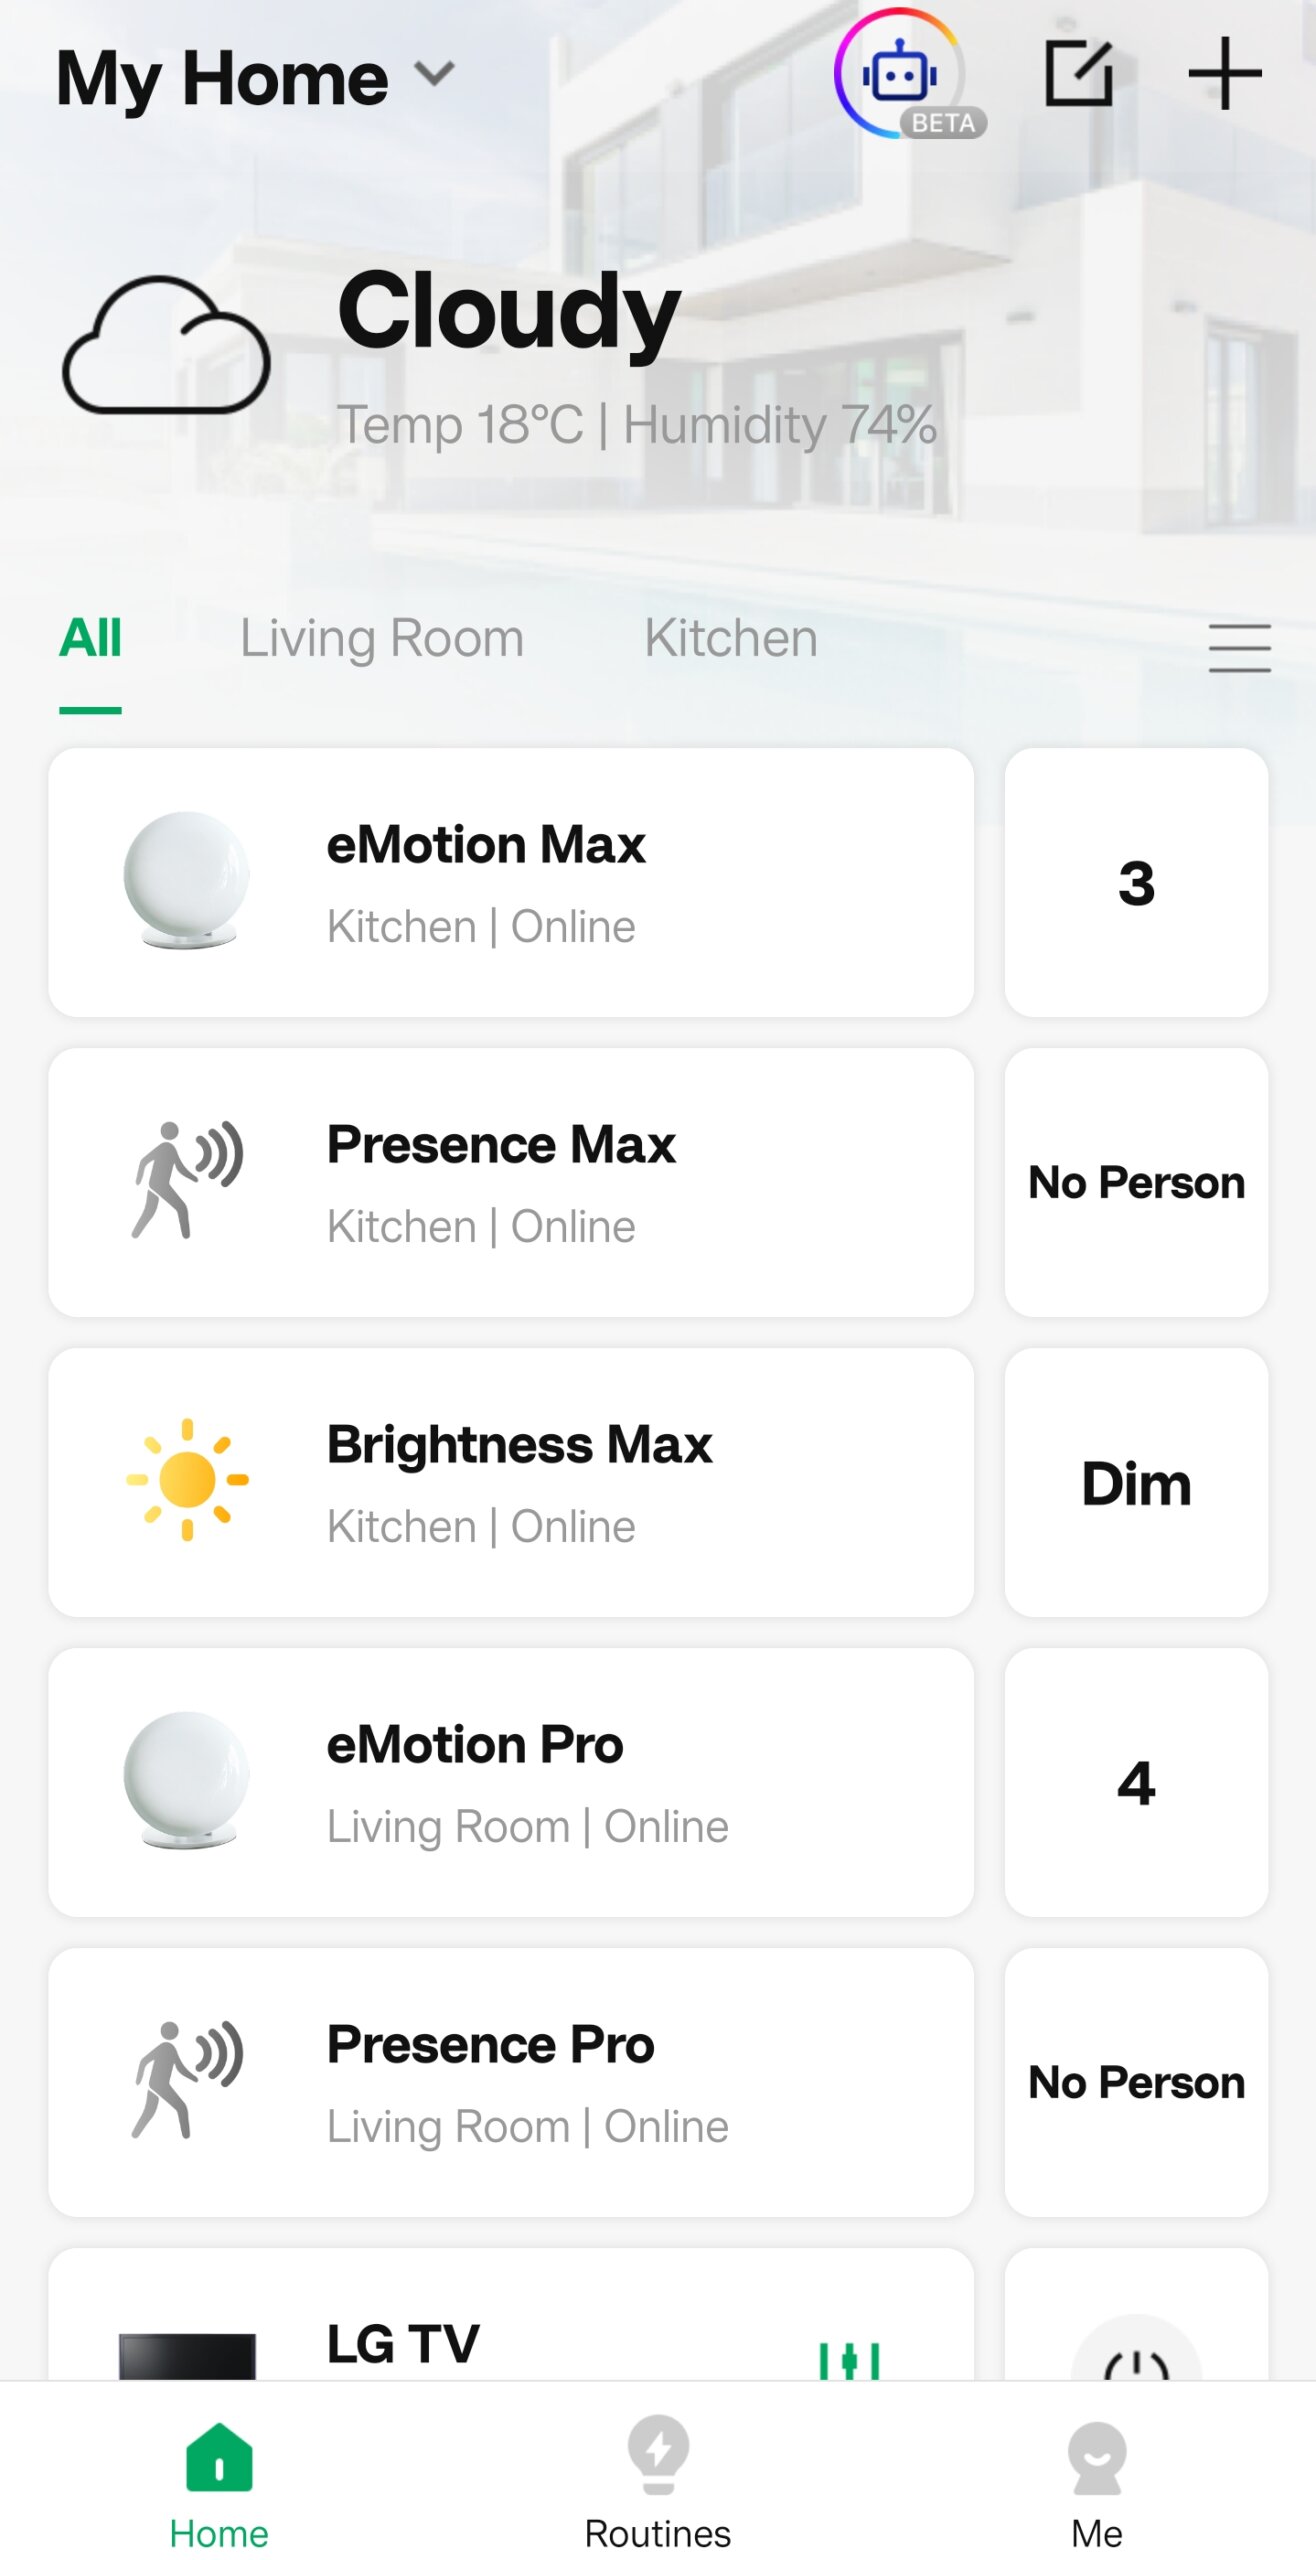
The app looks great and has some nice touches, though it could be improved in a few areas. First, it sometimes uses a slightly quirky “I know it” instead of the more usual “Ok”, which is kind of cute the first time you see it. However, more annoyingly is the way that each sensor capability has to be on-boarded one by one. For example, the app connects to the eMotion Max device itself and you give it a location, such as the kitchen. Each Max capability is then setup one-by-one, and there’s a few: presence, brightness, IR blaster, temperature & humidity, and each time it asks for a location, which of course, is the kitchen. It would be better if all the capabilities loaded with defaults inherited from the main sensor unit, which could then be edited if needed. Obviously this setup only has to be done once so it’s not a big deal but at the time it’s somewhat wearing.

The other minor issue encountered was with the IR blaster which seems to be slow to respond during the setup but once complete, it’s snappy and it’s quick to control the TV from the app.

Now that all the devices are setup, let’s talk about the party tricks of mmWave and the eMotion Pro & Max. First of all, both devices are able to detect through materials that would defeat a PIR senor. I put the eMotion Pro in cupboards with both a glass front and a wooden door, and it was able to pickup my presence through both materials without any obvious loss of sensitivity. For neat freaks, this could be a big benefit. Obviously, the IR blaster’s not going to work if it’s hidden behind a door: you win some, you lose some.

Talking about only the eMotion Pro for a moment, in addition to detecting presence, it is able to measure the distance from the sensor to the person and whether the person is approaching or receding. I’d say it was accurate to about 10 cm either way and clearly its only going to work accurately if there’s one person in the room. The app has the ability to set up to four detection zones based on distance from the sensor which could be useful when there’s only interest in presence or motion when it’s closer. I found that presence could be successfully detected up to about 5.5 m away – see the attached screen shot.

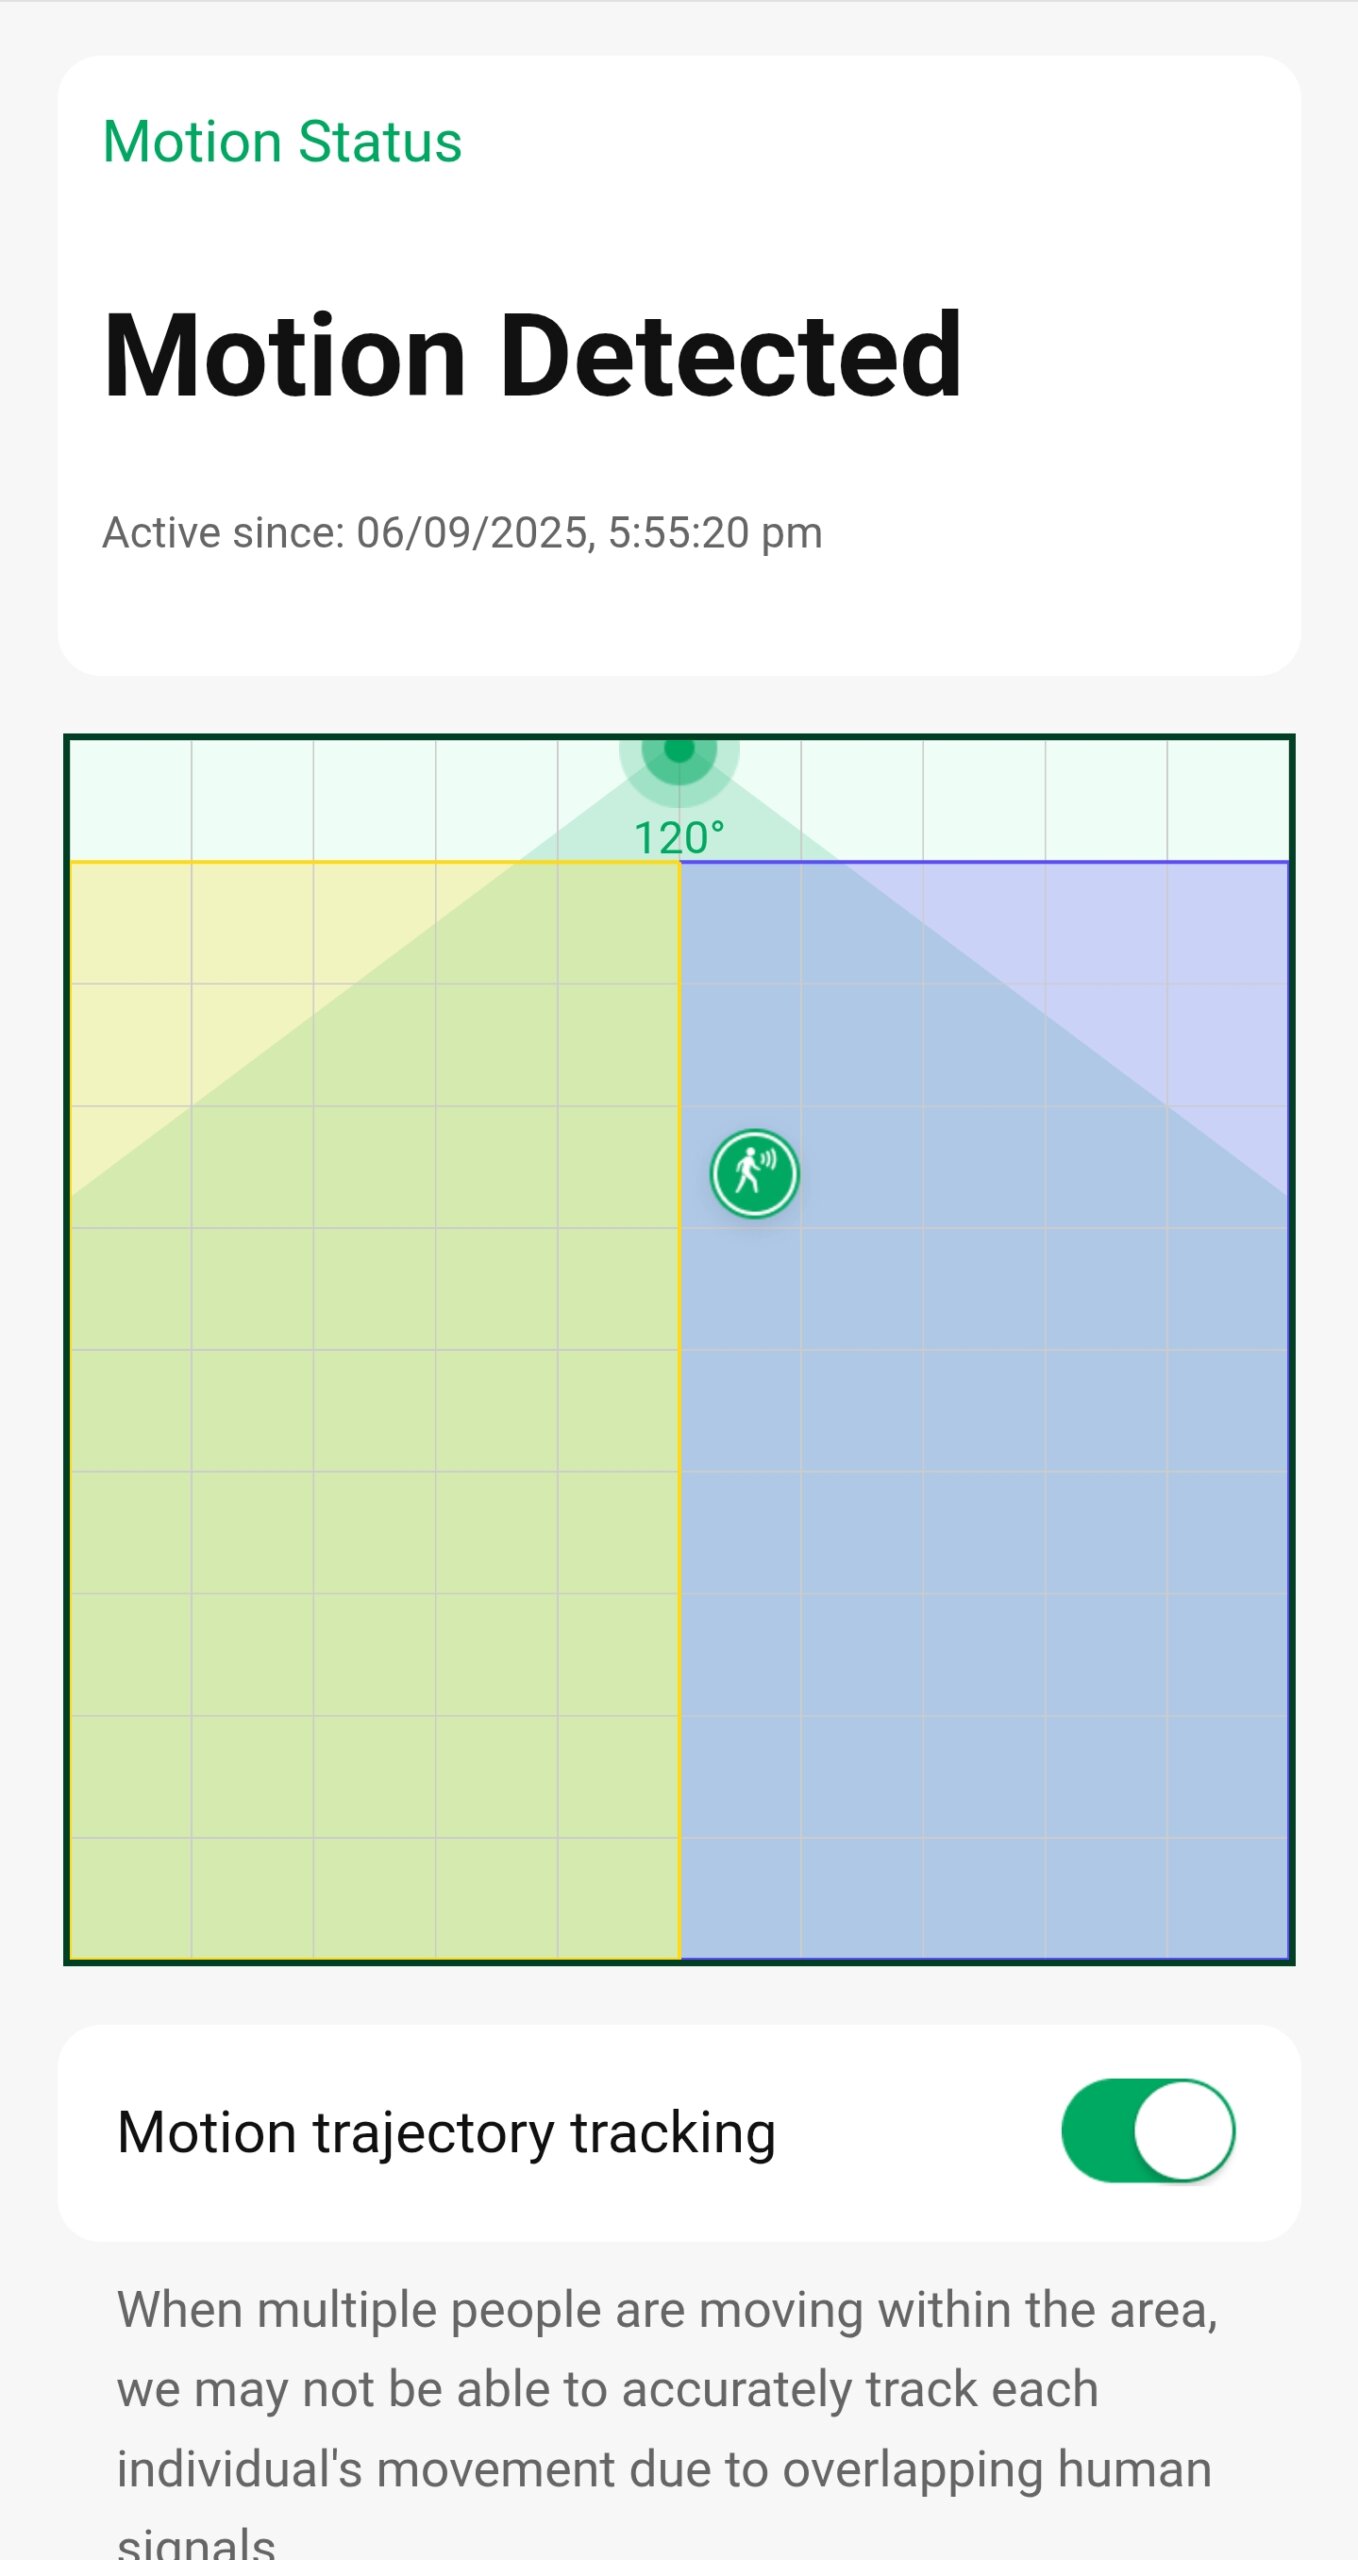
The eMotion Max is even more impressive. It can pickup multiple people in a room and show them in the space.I t’s very impressive in comparison to old-school PIRs which are either “motion” or “no motion”. As with the Pro, you can configure up to four zones on 2d floor plan and this is really useful. I have an open plan kitchen-diner and it’s really quite difficult using traditional PIR motion sensors to track motion cleanly in either the kitchen area or the dining area. With the eMotion Max, it’s really easy in that I can simply set up two zones, one for each area In the screenshot alongside, the blue area is the kitchen and the yellow the dining area. It’s not perfect, particularly when there are multiple people moving in the space, but’s surprising what it does manage to achieve.

In addition, the app has a number of settings for options such as “Not Detected For” time and “Sensitivity” should you need or want to change these. The app also offers routines based on “If this, do that, but only if” but I wasn’t able to test these as I only had these two sensors available.

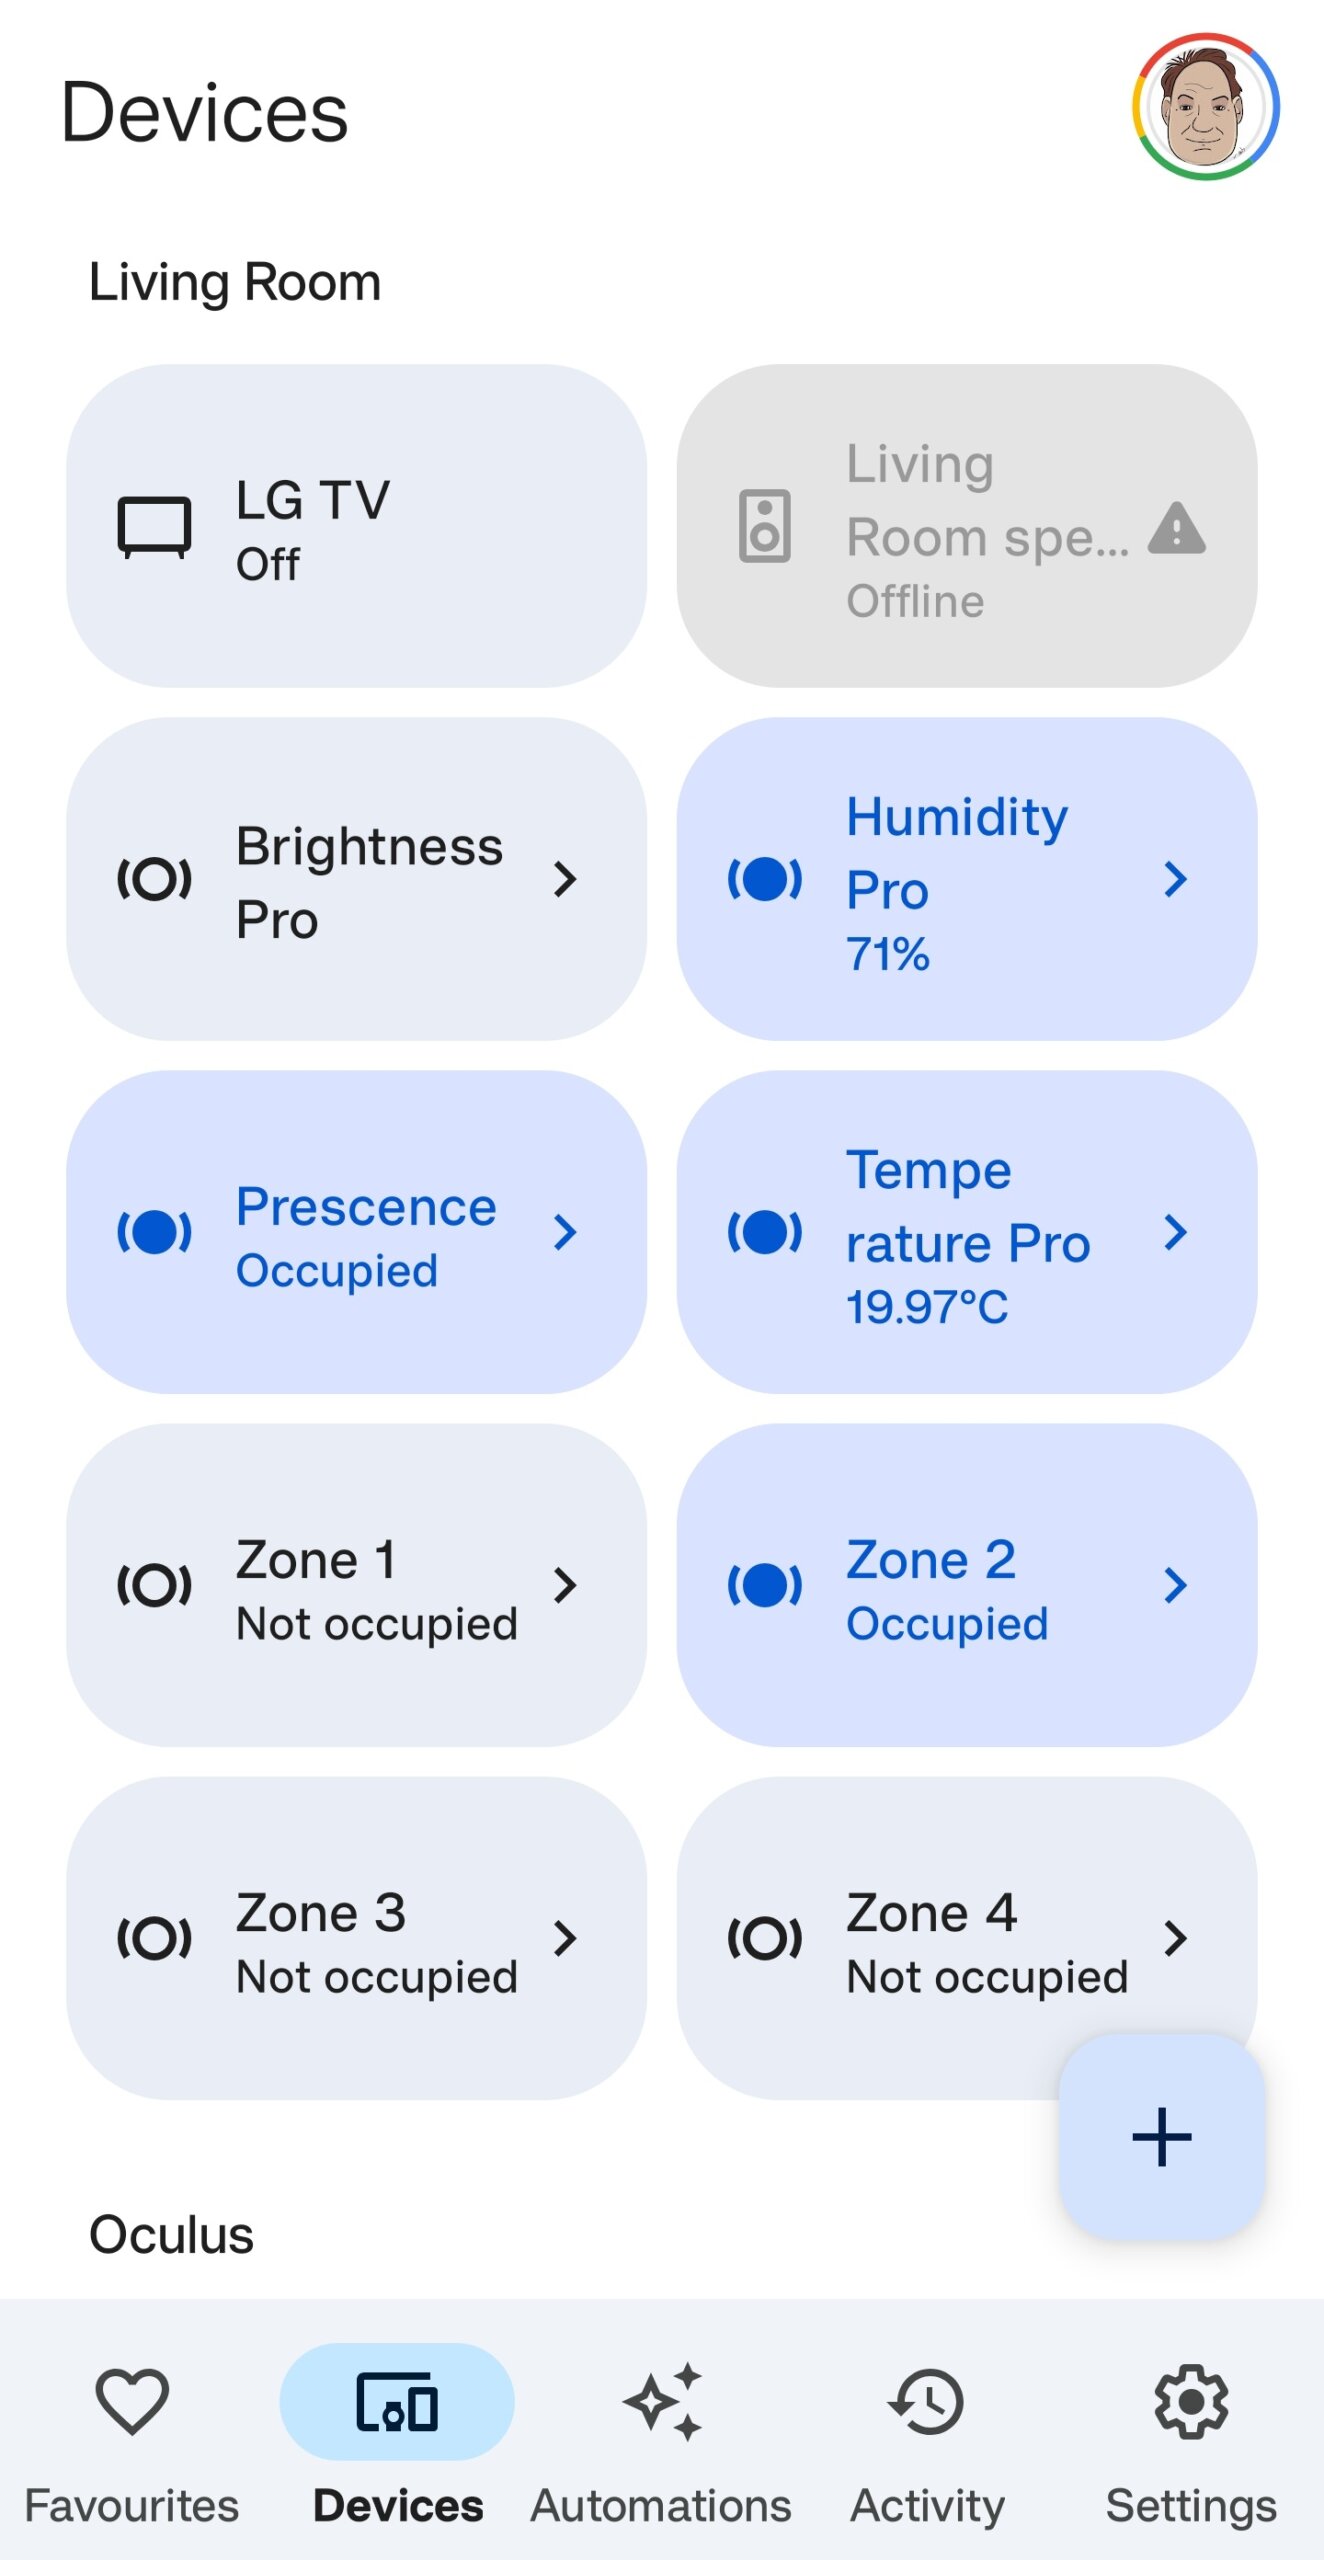
The LinknLink eMotion Pro and Max can be integrated into other smart home ecosystems, such as Amazon Alexa, Google Home and Home Assistant (HA). Regrettably there’s not yet integration with Samsung SmartThings, but I’m told it’s on the road map. Connecting to the other ecosystems is done via the LinknLink app and it all connected up first time with both Amazon and Google. All the attached sensors along with the detection zones appeared as devices and I was able to set up an Automation in Google Home that used the LinknLink devices to turn on the TV in one room when presence was detected in another.

Overall, little to complain about here other than a few minor quirks in the app and the technology itself works well. In terms of price, the LinknLink eMotion Pro is US$36.99 and the Max is US$54.99. Yes, it’s more than a traditional PIR but you are also getting more: the presence detection features are more detailed and there’s the ability to see through lightweight materials. Personally, I’m keen for the arrival of integration with Samsung SmartThings.

You can order the eMotion Max and Pro directly from LinknLink or else via Amazon in your country.

Thanks to LinknLink for providing the eMotion Max and Pro for review.


Nank Ultra Clip-on Bluetooth Earbuds Review


The Nank Ultra Clip-on Bluetooth earbuds are an interesting open-ear design which gently attaches over the outer part of the ear to keep them in place. The tiny speaker bud projects sound inwards to the ear canal with a larger bean-shaped control unit round the back of the ear. The Ultras are very light and once clipped on, you hardly notice that they’re there yet they stay on firmly. Unlike earbuds which go into the ear canal itself, there’s isn’t the same audio isolation and you can hear both the music and the outside world. If you are runner or cyclist and need awareness of the environment, these could be worth considering.

The Nank Ultra earbuds come in square-ish box along with a charging case, a short USB C charging cable and some instructions in both English and Chinese. The box is a little bit tricky to get open as the top and bottom slide very snuggly together. The case is an attractive dark metallic grey pebble shape with a USB C charging port at the rear and a small white LED at the front. The top half opens to reveal the earbuds nestling neatly inside the case, with a black loop connecting the silvery pods. One end is pea-sized, the other broad bean-sized. It’s definitely bigger than a coffee bean.

The earbuds snap into place in the case via magnets and Nank cleverly use magnetic polarity to make sure the Ultras slot in the right way round. There’s a small pogo pin connector that allows the earbuds to charge from the case. The specs suggest you get up to 8 hours from the earbuds on a full charge and you can then recharge three times from the case, giving a total listening time of 32 hours. Much as I love reviewing gadgets, I never listened to music for 8 hours straight but the battery life feels about right.

Putting on the Nank Ultra earbuds does take a little bit of thought but there is an easy knack to it. Simply lift the earbud by the black hoop and without twisting or turning the bud, position the smaller pod towards the ear canal and slip the larger bean round the back of the ear. After you’ve done it a few times, you’ll have it down pat. The larger bean is the control surface for the headphones so it helps to hold them by the hoop so as to avoid false touches. It sometime takes a bit of wiggling to get them sitting just right but once they’re in place, they’re so comfortable. I wear glasses and there was no interference at all.

Pairing with a smartphone was easy as out of the box, the Ultras went into pairing mode and my phone picked them up straight away appearing as NANK-Ultra. There’s a small blue-white LED which gives some feedback on the status of the earbuds. Control is done via taps on the bean roughly where the NANK lettering is – one tap adjusts volume, two taps starts / stops the audio and holding moves between tracks. You get the idea.

As I mentioned in the introduction, the Nank Ultra earbuds don’t isolate you from the outside world so there good for people who want to have some awareness of their environment but still want to enjoy their music. They also stay on the ear really well. I tried them running, biking and in the gym and had no problems at all with them coming off. They’re IPX5-rated so they’ll be ok with a bit of sweat but don’t be wearing them in the shower. I wore them for hours in the office and was able to wear them beyond the point where my ears would normally be sore.

When it comes to audio quality, don’t expect these to be IEMs, but they’re still good when compared with other earphones of a similar type. Music is detailed and clear, perhaps a little bright. Stereo comes across well though the sound stage isn’t huge. Bass is good for this kind of open-ear headphone (but don’t expect it to be like pumping bass of an in-ear device – you’re comparing apples and oranges).

Overall, no-one’s going to be disappointed here against other headphones at a similar price point and type. These sound good and the focus here is on comfort, which the Ultra delivers in spades.

Any problems? The Ultra earbuds can be used to take calls or, as I tried, as a headset on a Teams call. Technically it all worked, but feedback from colleagues suggested it didn’t quite sound like me. YMMV.

Pricewise, the full price is around UK£100 but there’s a discount on at the moment which brings the price down to about £45 and they’re available directly from Nank’s online store. Nank have kindly offered a further 15% off with the code “GNCandrew” which further sweetens the deal. To be clear, I don’t get any commission on this – it’s purely a discount code for my readers and watchers.

Thanks to Nank for supplying the Ultra Clip-on Bluetooth earbuds for review.


Keeping It Straightforward with the Roku Streaming Stick


Here at Geek News Central, we’ve always been fans of Roku and with the latest pair of devices, I don’t see any reason to change my opinion. Roku continues to provide a convenient way to make older TVs smart and offer additional content that’s otherwise unavailable. It’s also a great solution if you are travelling and want to have access to streaming content without having to risk putting in your credentials into a hotel TV everywhere you are staying. Finally, a real bonus is the clean user interface that isn’t always trying to sell something.

The folks at Roku’s PR firm in UK kindly sent me one of the new Streaming Sticks for review, specifically the 3840EU. This is the HD model (in comparison with the 4K Streaming Stick Plus), which comes with an affordable RRP of £29.99. That’s £10 cheaper than the competing Amazon Fire TV Stick and there’s a similar price difference at the 4K level too. I’m going to be trying out the Streaming Stick with an old Samsung TV that doesn’t offer anything by way of apps or streaming services: showing photos from a DLNA server is about as sophisticated as this TV gets, so it’s an ideal candidate for a Roku upgrade.

The first thing to notice is that the box is much smaller than previous ones and appears to be all cardboard: this is a good thing saving both on trees and transportation costs. Inside an inner box, there’s the Roku Stick itself, a voice remote with batteries (yay!) and a 1.5m USB A to C (power) cable. There’s no power supply as the expectation is that you can run it from a USB socket on the TV or you’ll have a spare one lying around. There’s no HDMI cable either as obviously the Stick should plug straight into a socket but if there’s a problem with space or access, a free HDMI cable extender can be ordered. Nice touch.

The remote itself is in the usual Roku-style with the purple four-way pad towards the top. It’s smaller than a normal TV remote and lower down there are shortcut buttons for Netflix, Disney+, Apple TV+ and Amazon Prime Video, with the volume controls on the right side. As this is a voice remote, there’s a mic button just below the four-way pad. During the initial configuration, the remote can be setup to control the TV’s volume and power.

Getting the Roku up and running is straightforward though it takes a little time to run through everything. Physical installation is simply a case of plugging the Stick into a free HDMI socket and then powering it from a spare USB socket on the TV. My ancient Samsung had no problem providing enough juice. The cable is a decent 1.5m long which is great, though I’ll probably order a shorter cable for a tidier installation as my USB and HDMI are close together.  Owners of previous generation Sticks will notice that while the device itself is the same size, there’s no need for the cable with the chunky in-line unit which tidies up the installation. Finally, pull the plastic tab out of the remote, turn on the TV and change over to the correct input, if it hasn’t done so automagically.

For now, it’s a case of following the prompts. The first step is to connect to the Wi-Fi and that can be a bit laborious if you have a long password. Fortunately, once you get past this bit, the voice features of the remote kick in and you can talk your way through subsequent screens. One thing I did notice was that the Stick doesn’t appear to pick up 5 GHz Wi-Fi signals in the higher bands around 150. If you are down in the usual 34 to 68 or even the low 100s, it seems to be fine.

If you have an existing Roku account you can login via your smartphone, give the Roku a name and location, and the install process will load existing apps (channels). If you don’t have a Roku account already, you’ll be prompted to create one. Finally you’ll be dropped into the Roku “Home” screen which has app tiles on the right and a short set of options on the left. Here you can use the four-way pad to choose what app you want to start, such as BBC iPlayer.

The “What to Watch” area is largely what it says. Rather than promoting apps, this offers films and TV shows that might be of interest. If you’ve used any kind of streaming service before, you know the drill. You can also save content to watch later and if you have done that, the programme will be listed here. There is separate “Save List” top level menu as well that will take you to only your saved programmes. If you find the duplication annoying, the available menus can be edited in the “Settings” area.

Next is “Search” and this is by far one of Roku’s best features. Roku’s search covers almost anything you can think of to do with film and even better, it’s voice activated. Say “Scooby Doo” and it will show you all the Scooby Doo programmes it can find. Say “Cary Grant” and it will show films that are available through the apps featuring the suave actor. Say “Steven Spielberg” and it will offer films he directed. Jaws anyone? It’s really good and one of the best features.

“Streaming Store” is where you find the apps to install on your Roku so they’ll show up on the “Home” screen. For UK folk all the terrestrial broadcasters are here: BBC iPlayer, itvX, Channel 4, 5 plus the likes of Now and Sky Store, and then there’s all the big streaming services: Netflix, YouTube, Paramount+, Disney+, Apple TV+, Prime Video, Spotify.
And that’s before we start on the thousands of other more specialist or niche apps. There’s everything you can imagine from travel, fitness, games, news, religion, space, sport, weather….Some of it is really good. Some less so. Roku have their own channel too, which has a range of programming from TV series to films and sport. All the available apps and channels can be reviewed at Roku to see if there is something of interest

Finally, the “Settings” menu lets you change various elements of the Roku to your own taste, such as 12 or 24 hour team, or which menu items are shown. You get the idea.

Three other points of note….first there is the truly awesome Roku City screensaver (and season variations) which is an homage to Hollywood with film Easter eggs galore. Avengers Tower – check. Ghostbusters fire station – check. Dr Who’s Tardis – check. It’s all there and if you are a film buff you’ll enjoy picking out the references. If it’s not setup by default, pop into the “Settings” and change the “Theme”.

Second, Roku has a complementary app that kind of combines a remote with the “Home” screen, so you both launch apps directly or move round the screens and apps on the Roku itself. It’s pretty handy.

Finally, it is possible to cast from a phone or tablet to the Roku so you can show off your photos. You can do it with AirPlay if you have an iPhone, but on Android you have to mirror your screen to the Roku which is a bit tricky as it’s done through Android Settings and isn’t terribly obvious. If I had one suggestion it would be to build the functionality into the Roku Android app so that it’s as easy to use as a Chromecast.

As I said at the beginning the benefit of Roku is the simplicity of the user interface combined with the wide range of apps or channels at a good price. While the obvious use of a Roku is to update an older TV, it can still bring improvements to smart TVs through the extra apps. Roku isn’t tied to a vendor or ecosystem, so isn’t always trying to sell you something and at £29.99, this really is an easy purchase compared to the cost of a new TV.

The new Roku Streaming Stick and Streaming Stick Plus are available from today at Amazon and in-store at Asda. Coming soon to Argos as well.

The Roku Streaming Stick was provided for review by Roku at no cost.


Philips Clothes Steamer Gets the Wrinkles Out


While the office dress code has become more relaxed since the pandemic, I still have to wear a shirt that’s wrinkle-free at the beginning of the day. While my office-wear is supposed to be “non-iron”, the shirts do tend to need ironing to look their best after they’ve been through the wash. Interestingly, a colleague (shout out to Craig) suggested using a steamer rather than an iron to quickly get the creases out, so I thought I’d investigate further.

I purchased a Philips Handheld Steamer 3000 series (STH3000/26) from an online retailer and at the time, I paid a little over UK£30, though it’s currently available at a slightly lower price of £29.99 (April 25). There are other handheld ranges (5000 series, 7000 series) but they are more expensive and have more features. I thought I’d stick to the basics and this particular model comes in an inoffensive blue-green colour. Unusually, the colour goes all the way from the steamer and down the cable to the plug. It’s blue-green all over.

As you’ll see from the pictures, there’s nothing particular fancy here. There’s a folding handle below the main body with a detachable water reservoir on one end and steam jets on the other. The handle incorporates a sliding on/off switch at the bottom with a trigger higher up to produce steam. It’s very easy to operate – fill the reservoir with water, click it on the back, turn on the steamer, wait about 30s for the light on top to go out and then pull the trigger. Steam comes out after a wee gurgle. Easy-peasy. Although I don’t think the weight will bother anyone, the steamer has a bit of heft to it at a little under a kilogram once the water is added.

Using the steamer takes a little bit of getting used to. First of all you have to find somewhere to do the steaming. The clothes ought to be vertical, rather than being laid on an ironing board, so I tended to put the hangar over a door. It’s a bit unsatisfactory but that’s not the Philips steamer’s fault and I’d be very tempted to get something like this to make life easier – a garment overdoor steamer pad. It kind of replaces the ironing board as somewhere to do the work.

In practise, the steamer works and it works pretty well. Pull the trigger and gently move the steamer over the clothes to let the steam do its stuff and release those wrinkles. It’s fairly quick too, and with a bit of practice you begin to develop a technique so that you’re not going over the same area multiple times and you know how to tense the fabric to help pull it flat. If you are worried about scalding your fingers, don’t be as the steam gets absorbed by the fabric so it never really escapes. Clearly you can scald your fingers if you try hard enough but steam safely and it’s fine.

My only real gripe is the size of the water reservoir (100ml) as I found it only lasted a few shirts and then I’d need to refill. If you are serious about taking up steaming, look for a bigger water reservoir.

Obviously the big question is whether it’s faster than ironing….yes and no. It’s definitely faster for shirts because much of the time is taken up with undoing and doing up the buttons. With the steamer you can simply take the drying shirt and steam it on the hangar. For something like a t-shirt that has no buttons and you are likely to fold at the end, I think I’d stick with the traditional iron. Overall, I’m going to continue to use the Philips steamer and if it sticks for the long term, I might look to upgrade.

There’s more in my video below.


Nank Runner Diver2 Pro Bone Conduction Headphones


The Nank Runner Diver2 Pro (henceforth RD2P) headphones are a little bit different from your usual Bluetooth headset or earbuds. Instead of sitting over or in your ear canal, the RD2Ps use bone conduction to get sound into your ears, with the “speakers” sitting a little in front of the ear, resting on the top of your jawbone. The vibrations pass from the RD2P into your skull and then on to the auditory sensors buried deep in your ears: it’s a little bit like how you hear yourself. What are my first impressions? They’re great and I wish I’d discovered them years ago.

The RD2P headphones come in a small box with a little pile of accessories aimed at getting the most out of the RD2Ps. There’s the RD2P headphones themselves, which hook over the ears with the loop going round the back of the head rather than over the top. There’s a bit of spring in the band, making sure that the headphones stick firmly to your head. On the right hand side, there are three control buttons, ostensibly volume up, down and play/pause but combinations of multiple presses change the operating mode of the device. On the inner side, there’s a magnetic pogo pin connector where the data transfer and charging cable connects. The cable is included in the box.

Battery life is stated at 10 hours and I’m not going to quibble with that. I fully charged the headphones when I got them and I’ve still to charge them after about two weeks and a good bit of exercise.

Data transfer? Yes. Not only can the RD2P work as Bluetooth headphones, it also includes a media player with 32 GB of storage, which is fantastic if you want to listen to music while swimming. Obviously you don’t want have your smartphone at the side of the pool and Bluetooth radio waves really don’t transmit well through water, so having a built-in mp3 player is essential. Three presses of the middle button switches between the Bluetooth and media player (TF) modes.

Also in the box are some ear plugs in a little case: I’m not an earplug person so I didn’t use them. Let’s be honest, the whole point of bone conduction headphones is to avoid sticking things in your ear. In addition to the ear plugs, the RD2P comes with what Nank calls “sound quality enhancers”. They’re in pairs, one for each ear, and come in small, medium and large to sit inside the outer part of your ear – have a look at the picture. They did work – I’ll talk about audio quality shortly – but I’m not convinced they’ll be used much. These headphones are aimed at active people doing running, biking, swimming and the enhancers are a bit fiddly and something to lose.

Rounding out the box contents is a small silicone strap for, say, connecting the headphones to swim googles, and of course, some instructions. There’s no carrycase included though one is available from Nank’s store for an extra £15. Probably worth it if the RD2Ps are going to be lugged round in a gym bag and you don’t want to trash them.

The Runner Diver 2 Pro headphones are aimed at people doing sport and I think they do this job admirably especially as they’re IP69 rated which means they’re properly waterproof – according to the spec it’s up to 10 m deep for 5 hours. I tried them running, biking and swimming and for swimming, they’re a total audio revelation. Let’s talk about running and biking first….in terms of fit, the RD2Ps stayed in place really well. The combination of the over-ear loops and springiness of the neckband works well, and no issues with wearing glasses either. They’re very easy to wear generally as there’s no tiredness that sometimes comes from wearing headphones over or on the ears or earbuds in the ear. With cycling you do have to figure out how they’re going to work with your helmet straps which come down round your ears. I had to put the RD2Ps on first and then my helmet, otherwise the helmet strap blocked where vibrating pads rested on my jaw.

An advantage of bone conduction of headphones is that as they don’t obstruct the ears, other sounds can be heard clearly. This is handy if you need to be aware of a car coming up behind your or even if you simply need to hear someone talking to you. Nank advertise a noise cancelling capability with the RD2Ps which is engaged by tilting the earpads backwards closer to the ear canal. The effect isn’t as pronounced or as convincing as ANC earbuds so I wouldn’t rely on them for a transatlantic flight.

When it comes to audio quality, don’t expect these to be IEMs, but it’s still good. Music is detailed and clear, a little bit brighter, perhaps a bit thinner and the biggest difference is a reduction in bass. There’s not that “oomph” at the low end that can be expected from air-transmitted sound. Don’t get me wrong, I was delighted when I heard these for the first time simply sitting at my desk – they’re very clear and you can hear great detail. And we haven’t even talked about swimming…getting in the pool with these on is revelatory experience when your head is under the water. The music suddenly becomes richer and fuller: I couldn’t stop grinning for my first few lengths and I was amazed that other people didn’t hear the music as I swam past. They’re truly brilliant. It’s crazy being at the bottom of the pool (2.6 m) bopping away to your favourite mixes.

I’ve used other products with waterproof earbuds which were supposed to seal the ear canal and keep the water out. However, as soon as water got past the seal the sound became all muffled and there was never any fixing the problem while in the pool. You still do get odd effects with the RD2Ps depending on whether your head is in or out of the water as the liquid drains in and out of the ear but you can still hear the music or podcast. Wearing the earplugs helps with that but I’m quite happy doing the crawl with one ear occasionally out of the water. I honestly can’t see myself doing lengths without the RD2Ps ever again.

Any problems? The female voice that announces functions like “Pairing” or “Bluetooth mode” is a bit, err, vibrate-y and gives me the tingles, which doesn’t happen when listening to a podcast.

Pricewise, the full price is around UK£155 but there’s discount on at the moment which brings the price down to about £125 and they’re available directly from Nank’s online store. The Runner Diver2 Pro headphones were supplied to me for review by Nank but I can genuinely say that I’d spend my own money on these for the swimming performance alone. Definitely recommended.

Thanks to Nank for supplying the Runner Diver2 Pro bone conduction headphones for review.


Free Podcast Media Kits – Review


For many years I paid for a media kit for this site’s podcast. It was expensive and had to be updated regularly. The team at Blubrry Podcast now provides all of their podcasters with a free media kit. So what makes up a good media kit, and how much do they usually cost.

A podcast media kit is a comprehensive document containing information about a podcast and its host or hosts. A media kit promotes and advertises the podcast to potential sponsors, advertisers, and other partners. Media kits usually include essential facts and figures about the podcast, such as the topics it covers, the number of downloads it receives, the demographic of its listeners, and other essential metrics. They may also contain a bio of the podcast’s hosts and any awards it has won or media coverage it has received.

A media kit is essential for podcasters looking to increase their visibility and reach out to potential sponsors, advertisers, and other partners. It provides a concise overview of the podcast and its hosts, allowing potential partners to quickly and easily determine the podcast’s value and the kind of audience it appeals to. It also shows that the podcast is professional and well-organized, which can help to set it apart from the crowd.

The host can use the media kit for various purposes beyond advertising. For example, it can be used to apply for awards, pitch to media outlets for interviews, and even apply for speaking engagements. It can also be used to create a professional-looking website for the podcast, as well as to create a press page on the website to promote the podcast.

The cost of creating a podcast media kit will depend on the kit’s complexity and the number of elements that need to be included. Generally speaking, a basic media kit can cost anywhere from $ 100 to $ 500, while more complex media kits can cost upwards of $ 1,000.

The free media kit provided by Blubrry Podcasting to its hosting customers is a comprehensive and well-designed document that contains all the essential information about a podcast. It includes a detailed overview of the podcast, its audience metrics, social media, and audience size. The kit consists of a podcast bio and a list podcast’s episode performance. The media kit provided by Blubrry Podcasting is an invaluable tool for podcasters looking to increase their visibility and reach out to potential partners.

Blubrry Podcasters can create their free podcast media kit within the podcast statistics section of the Blubrry Podcaster Dashboard. The best news is that the media kits update every 24 hours, automatically including all the most recent statistical data included as part of the Podcast Hosting package at Blubrry Podcasting.


TickTime 2 Digital Timer Review


The TickTime 2 Standard Timer is a kinetic gadget that does only one thing: measure elapsed time. It’s simplicity itself to use – place the timer on its side and it counts down, place the timer screen down and it counts up. Can it really be that simple? Let’s take a look.

Think of the TickTime Timer as a digital egg timer. It is the size of a large egg, but it’s shaped nothing like an egg. It’s hexagonal like a small piece of the Giant’s Causeway in Northern Ireland. The outside is a silvery plastic with the numbers 3, 5, 10, 15, 25, 30 embedded on the flat sides. One end has a simple light up display and speaker grille but the other has small circular colour screen with push buttons on each side and a USB C charging port. There’s a short USB A to USB C cable for charging but no charger (not that I’d really expect one).

This display shows the count down / up time, with tiny little indicators for volume and battery. There’s an outer ring that loses segments as the time counts down.

The TickTime has three modes of operation.
1) If you want to measure elapsed time, place the TickTime screen down and the light on the end will flash. When you’ve finished timing, pick up and turn it over to see the elapsed time on the screen.
2) If you want to time 3, 5, 10, 15, 25 or 30 minutes, place the TickTime down on a flat side with the desired number of minutes upwards. The selected time will flash blue and countdown time will show on the screen.
3) If you want to time a specific interval, e.g. 1’30”, use the buttons on the left and right of the screen to set the time. Then place the TickTime down and it will count down from the selected time.

Obviously when the countdown gets to zero, the numbers light up and an alarm goes off – it’s a simple beep-beep – and there are four volume levels including a silent level. At full volume, the alarm is piercing and you’re not going to miss it.

The timer has one final trick up its sleeve as the base is gently magnetic meaning that it can be stored on a fridge, steel noticeboard or any other magnetic surface. It’s a nice touch but the magnet could be a bit stronger as it sometimes wouldn’t stay at the selected orientation. For example, I couldn’t use the built-in 10 minute timer as it would twist round and reset the timer.

The screen doesn’t come out particularly well in the photos but it’s very readable indoors. In terms of battery life, I used the TickTime for a couple of weeks for the review and the battery level is still at three bars.

On the whole, the TickTime timer does exactly what it’s supposed to do – and it’s perfect for use in the kitchen or for playing games when you need to set a limit to the turn time. There are a few flaws though. It can be tricky figuring out which way is up! Sometimes I’d be staring at the numbers on the screen in confusion until I turned the timer over and it was the right way up.

One minor irritation is the when counting up, the screen goes dark, so you can’t have a sneaky look at the elapsed time by lifting it up without turning it over. It would be handy if the display stayed on. I’d also be tempted to colour the push buttons silvery-grey to match the outside and provide a little more visual interest.

In addition to keeping control of turns in games, the TickTime will be of interest to practitioners of the Pomodoro technique. This is a time management methodology that splits activities into pomodoros of 25 minutes each followed by short breaks of 5-10 minutes. The TickTime is perfect for tracking those activity and rest periods.

The TickTime was originally an Indiegogo campaign back in 2020, raising over US$400,000. Today on Amazon.co.uk it’s UK£38.99 though there is currently a 5% discount coupon available. According to CamelCamelCamel, the price has previously been as low as £23 but that was a few years ago pre-pandemic. At full RRP, I think that’s a little pricey, so look out for the occasional price drop. Obviously there’s competition out there, mainly from apps on phones or digital assistants like Alexa (though I can’t get Alexa to count upwards), but if you want a dedicated timer without distractions, the TickTime seems a reasonable choice.

Overall, it’s a neat little gadget with a few flaws and if timing is your thing, it’s worth a look.

Disclaimer: The TickTime 2 Standard Timer was provided for review by TickTime at no cost.